How to Fix Yellowing Blueberry Leaves
 |
| Healthy Blueberry |
I learnt a valuable lesson this year, when despite having blueberries in a low pH soil medium, they refused to grow and were suffering. Wondering why, I delved into the internet, and can now offer this very important, and simple tip.
Previously I wrote about the very specific soil needs of blueberries, and said that for blueberries to grow healthily they need a low soil pH, or they will slowly deteriorate and eventually die, however there is another consideration to make, but first how do we identify pH problems in blueberries.
Blueberry Deficiencies Caused by High pH
Blueberries affected by high pH die from a lack of some nutrients and an overdose of others. In particular blueberries lack iron and have trouble regulating the absorption of calcium in high pH environments.
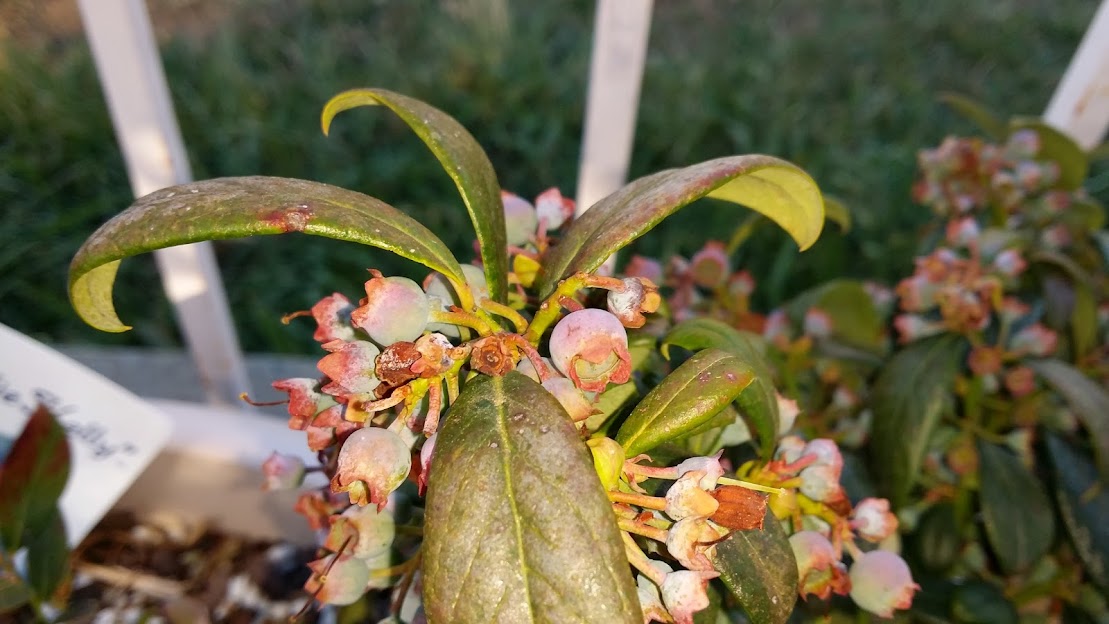
Initially these deficiencies will be marked by yellowing between the veins of the leaves of your plants, and as the situation worsens will spread to the leaf tips, and eventually whole leaves yellowing and dropping, this is known as iron chloriosis. Plants in this state will become stunted, slowly languishing before they eventually die.
 |
| Chloriosis Due to Iron Deficiency from High pH |
 |
| Without Intervention This Plant Will Eventually Die |
So How Do We Prevent This?
Initially, planting in an acidic media like pine bark, peat moss or azalea potting mix will provide an acidic environment however, over time, this may not be enough. This is because in many places the water that comes from your tap has quite a high pH. Over time, carbonates and bicarbonates accumulate in the soil media, raising the pH and making the environment unsuitable for growing blueberries.
In Canberra, at my house, tap water has quite a high pH of at least 7.5 .
 |
| Canberra Tap Water pH is Much Too High For Healthy Blueberries |
There are a couple of answers to the problem.
Irriagte With Rainwater
The first and most simple solution is to irrigate with rain water or distilled water. Rain water actually has a pH often around 6-7, however it is totally free of bicarbonates, which are actually the culprit. If you water solely with rain water or distilled water, you will have no problems with your blueberries, provided your soil media itself is still acidic. Tap water is often full of compounds such as calcium bicarbonate which increase the hardness or alkalinity of the water.
Acidify Your Water
If you have been watering with tap water for a while now, and have accumulated bicarbonates and carbonates in your potting mix, and are suffering nutrient deficiencies, rainwater will not be enough and you may need a more forceful approach. This is done by acidifying the water in your watering can before watering your plants.
As you add acidified water, bicarbonates are neutralised, and the pH and alkalinity of your potting media will drop.
Be careful not to overdo it though, too much acid will most definitely kill your plants! It is a good idea to purchase a water pH testing kit, and add enough acid to lower the water pH to about pH 5.
Which Acid to Use?
Adding acid can sound pretty daunting until we think of all the acids around us. Vinegar also known as acetic or ethanoic acid, is a common acid found in almost every single house, as is the citric acids found in citrus fruit or even the tartaric acid found in many fruits and in pantries labelled as cream of tartar. Not all of these are suitable however for adding to your irrigation water.
Acidifying Water with Vinegar
For the simplest, cheapest and safest solution vinegar is the way to go. It is not an ideal acid to use, but should suffice if you add it to your water consistently. Vinegar is inferior to other acids because it is a weak, organic acid, and which will be broken down by bacteria in the soil, so that over time the bicarbonates that have neutralised, held by the acid, will be released back into the soil.
A much more effective solution is an in-organic acid such as sulphuric acid. But first a word about safety.
Safety and handling with Sulphuric Acid
I debated with myself whether or not I should write about using sulphuric acid to acidify water for blueberries, because it can be extremely dangerous. I then thought of the difficulty I had finding quality information myself, as well as a detailed description of the risks involved. Finally I decided that people will do dangerous things regardless, and I would rather you had full (or at least expanded) understanding of the risks and how to mitigate them as much as possible.
So, first of all a disclaimer: Use sulphuric acid at your own risk. Although very dilute sulphuric acid is relatively safe to handle, if done carefully, I do not recommend handling or storing strong acids such as sulphuric acid in solutions above 10% concentration. The information below is for your information purposes only, and to make you aware of the dangers associated with handling and storing concentrated strong acids. If you can only buy strong acids above 10% in concentration, ask the store professional to dilute it for you, if at all possible.
Acids can be dangerous. Acids can be VERY dangerous in higher concentrations and sulphuric acid is one of these.
When diluted below 10% sulphuric acid is relatively safe. Even diluted however it will corrode fabric, damage metals, some plastics and other materials and cause irritation or burns to your skin. If washed off immediately with cool running water, there will likely be little to no negative effect. If you spill or splash diluted (less than 10%) concentrated sulphuric acid, wash under cool running water for at least 30 minutes. You probably will not need medical attention. Discard any clothing that has been splashed with acid.
More dangerous concentrations of sulphuric acid are those above 10%. The concentration of the acid will be written on the bottle.
 |
| The Bottle I Received - Acid at This Strength Is Probably Not Worth The Risk |
Concentrated sulphuric acid is another beast altogether. In high concentrations it will eat through or destroy most materials including metal, can etch concrete and can only be stored in certain types of plastic or glass vessels. More importantly as concentration increases it will quite literally EAT YOUR SKIN TO THE BONE. This will be horrifically painful, and will scar. To make matters worse adding water to highly concentrated sulphuric causes the release of a large amount of heat, and will cause high level burns.
Mist or vapour from highly concentrated sulphuric is also extremely dangerous.
Do NOT play around or underestimate the danger of highly concentrated sulphuric acid.
In Australia you can find sulphuric acid in dangerously high concentrations. The sulphuric acid I bought for my blueberries came to me at 98% concentration. AKA eat the skin off your bones concentration. Avoid this risk at all costs and instead try and find sulphuric sold as battery acid, generally at 30-35% concentrations. You should be able to find this at car stores and some mechanics.
At this 35% concentration, sulphuric will eat through your clothes and damage metals. It will cause painful burns on your skin if you spill it, and will cause great damage your eyes and mouth if it splashes. The mist and fumes will damage your throat, nose and lungs if breathed. However, provided you are careful and treat the acid with respect I believe most adults can safely dilute battery acid concentrations of sulphuric themselves by adding it to water.
You need to add 1L of 35% sulphuric acid to at least 3.5L of water to bring your sulfuric below 10% concentration, which is quite safe for use and storage. NEVER add the acid first, always put the water in your container first, and then add the acid SLOWLY and CAREFULLY second. Pour the liquid at arms-length with your face turned to avoid any possible splashes. Do not mix in an enclosed space, as the fumes are toxic. Break between pouring so that the liquid has a chance to diffuse the heat that will be produced.
Always Add Acid to Water – Not Water to Acid
When sulphuric acid comes in contact with water a large amount of heat is released, and adding water to acid can cause the liquid to instantly boil and spray you with acid. Add the water FIRST, acid SECOND. Wear safety glasses, a long sleeved shirt and pants, gloves and covered shoes. If you get any acid on your skin or clothes, remove your clothing and rinse the area thoroughly with cool running water for at least 30 minutes. Seek medical advice as soon as possible.
If you can only find acid in higher concentrations than battery acid at 35% then you need additional safety precautions. At 98% concentration, you will need a minimum of 16.2 litres of water to bring your acid into safer concentrations. You will need a protective face covering/mask, and on top of long pants and shirt, a coverall that will protect from any splashes.
Even a drop of acid at this concentration will cause instant burns and will scar. If you spill any, wash immediately with copious amounts of water for at least 30 minutes. It will burn. Seek immediate medical attention.
Sorry to harp on about this, many times in our day we are warned about potential dangers and how bad something can possibly be, only to find out the risk was greatly exaggerated. This is not one of these times. Concentrated sulphuric acid can, and will, irrevocably change your life if you have a bad accident.
Here is a rough guide as to the amount of water needed to dilute 1L of different concentrations of sulphuric acid to safe levels (<10%);
10% and below = safe;
1L sulphuric at;
15% concentration = add to 600ml water
20% = add to 1.2L water
30% = add to 2.5L water
40% = add to 4L water
50% = add to 5.6L water
60% = add to 7.5L water
70% = add to 9.6L water
80% = add to 12.1L of water
90% = add to 14.6L of water
98% = add to 16.2L of water
Dilute sulphuric acid can be safely stored in most plastic containers, but to be sure most containers have the plastic type on the bottom. On the chart below, the top row is are different types of plastic, and the far left column is the type of liquid being stored.
 |
| Green Can be Stored Safely for More Than 30 Days, Blue Up to 30 Days |
Are You Serious, Why Would I Even Consider Something So Potentially Dangerous?
Sulphuric acid is a non-organic acid. Once it is added to your container it will permanently bind the carbonates and bicarbonates in your water and soil media, rendering them as neutral compounds that will not hurt your blueberries. Once you have dilute sulphuric acid, a small amount will last a long time.
If you can find sulphuric acid already diluted to below 10% the risk is very minimal, and is no more dangerous than handling pesticides, poisons, petrol or other dangerous substances you may find in your garden shed. In fact, I regularly used dilute sulfuric and hydrochloric acid in highschool.
How much Dilute Acid to Add to Your Watering-can?
Now that the safety information is out of the way, how much dilute sulphuric should you add? Very little. A teaspoon of 10% sulphuric acid is far too much to add to a standard 9L watering can, and it is worthwhile diluting your acid down in half again, and putting it in a container for daily use.
 |
| A Pipette Can be Used to Extract Small Amounts of Liquid Safely |
It is also worthwhile purchasing some plastic pipettes from ebay, which will cost you a couple of dollars, and will allow you to measure out small amounts of acid to transfer to your watering can. I add approximately 2ml of very dilute acid to 9L for my plants. I determined this amount using a water pH testing kit, and added small amounts of acid to my watering can until I reached a pH of 5. This may vary for you.
 |
| This is Almost Too Acidic, and Could Be Diluted With Even More Water |
After all your initial hard work getting dilute sulphuric acid, when you need only 1ml at a time 1 litre of dilute acid will last a long, long time.
Whichever method you choose; watering with distilled or rain water, using vinegar or using sulphuric acid, hopefully any problems with chloriotic blueberry plants will be reversed shortly!
 |
| Healthy Green Leaves Again |