Showing posts with label coconut husk chips. Show all posts

Wednesday, October 1, 2014

The Tomato Plant Container Size Experiment Part 1

So, around about October I begin to plant tomatoes out into their containers for the season. I usually plant the majority in the ground, but like to have container plants as well, as they often ripen quicker.

But then I am faced with the question, what size container should I use, and what happens if I use a smaller container?!

This year we find out.

Introducing the Tomato Plant Container Size Experiment

Last year I looked at what effect growing a range of different plants in different potting mediums would have on their overall growth and yield. The answer was surprising. There seemed to be little to no difference regardless of whether I used a special potting blend, Al "Tapla's" well-known 5-1-1 mix or straight off the shelf $2.50 potting mix. This flew in the face of everything I had read about soil properties and improved growth, and although by no means a conclusive experiment, it definitely was interesting to see such little difference.

This year I am going to look at how container size affects growth of tomato plants. The experiment will be simpler than last year, and will simply look at what happens to tomatoes as you decrease the container size.

Overview

I will be using three different container sizes for this experiment, and will have two tomato plants per container size, so we can see if there is wild differences in growth or yield even between plants in the same container size.

The containers I will be using are below, and from left to right are 13 liters, 23 liters and 42 liters.

By the time I has used all my soil medium, the containers were not quite full, and so I will estimate that the actual soil volume in each is somewhere between 9-11 liters, 18-21 liters and 36-39 liters respectively. 

From left to right 13L container, 23L container and 42L container (as marked on containers)
I chose a variety of tomatoes from the local hardware store, that were approximately uniform size and health. The punnet came with 8 plants, this experiment will look at 6 of those plants.

The tomatoes used in this experiment
More information, for those interested
I will simultaneously be growing other tomato plants in the ground, and in other containers which I may refer to, but these wont be used as a comparison for this experiment.

What sized container is actually recommended?

It is difficult to find a straight answer when searching for what size container to use to plant your tomatoes in, with some ranges between 10L as a minimum and up to 60L or more as being recommended. 

This site suggests 30L as a minimum stating;
I find the most important factor is volume of dirt. I use containers that hold 30 liters (7.3 US Gallons), and I find this is both the minimum but also an amount that usually works okay. More is obviously better, if possible.
This thread from GardenWeb seems to come to the consensus that 5 Gallon containers (18.9L) are sufficient, even for growing beefsteak tomatoes.

And this page from the North Carolina State University says that the range of container size is anywhere from 5 - 20 Gals (18.9L - 75L).

Why should we even care - just use a huge container!

Anybody that has planted a number of container fruits or vegetables knows that as container size increases, cost seems to exponentially go up. And the more you plant, the more you cop it.

With increased container size you need not only a more expensive container, but also more quality soil mix to fill it. As size increases so does the weight of the container, and a 60L container with soil and a plant (weighing up to 45kg itself) can be a nightmare to move around!

So the goal should be to find the very minimum container size that provides sufficient quality and quantity of yield to be worth the effort of growing. 

The soil mix used in this experiment

Despite finding in my last experiment that ordinary old potting mix performs just as well, old habits die hard.

The mix I used for this experiment is the same for all container sizes.

I started by rehyrdrating a block of coconut husk chips. I used the blocks sold at Bunnings, which go for about $12-13 and are far inferior to the chips I have used previously. They are much larger, and just seem less refined. I prefer the orchidmate brand, which can be found online.
The packet of the husk chips says that it expands to up 60L, but here it is after being wet, in a 62L container. I estimate it expands to a volume of about 30L or less.

Re-hydrated coconut husk chips
I split the husks in two even parts, and to each part added the following:

1 bag of orchid mix, which appears to be composted bark, of about 5-10mm grade.

Can be found at Masters hadware stores for about $8 per bag
1 bag el-cheapo potting mix

This is a $5 bag. Couldn't find a $2.50 bag anywhere!

2 large handfuls of organic tomato fertiliser, and 2 large handfuls of fig fertiliser, which is made up of super-phosphate, bonemeal and dolomitic lime.

Add fertiliser
Organic tomato fertiliser
Mix all together and we have our mix. It is a nice damp, loose and aerated mix that should allow for good root growth! Here is a quick vid, please excuse my shaky and unfocused camera-work!

Filled, transplanted and ready to go

After filling all my containers with my soil mix, I have transplanted my tomatoes and am ready to watch and record them grow! As the nights are still quite cool here in Canberra I will be lugging them in and out of the garage each night to protect them from any frosts.

All lined up nice and pretty!

So stay tuned. I feel I am lacking a really big container comparison, the 60L group, and I do have 2 more plants left over... so I might end up adding another two plants tomorrow !
Friday, March 21, 2014

A Close Look at The Fig Collection - White Adriatic

I have been planning to update each of my figs for a long time now, especially as I am beginning to see fruit off of many of my trees. Today I will start with one of my favourites; White Adriatic.

Summary

Description; A vigorous plant that produced a number of breba and main crop figs. Performed poorly in 5-1-1 and enjoyed coconut husk chips in a larger pot.

Breba Crop? Yes

Breba taste? Sweet honey-nut

Breba appearance? Mottled, areas of deep red to light pink to pale pink

Main crop taste? Rich, sweet, berry

Main crop appearance? Uniform deep dark red

Problems? Rust

The Plant

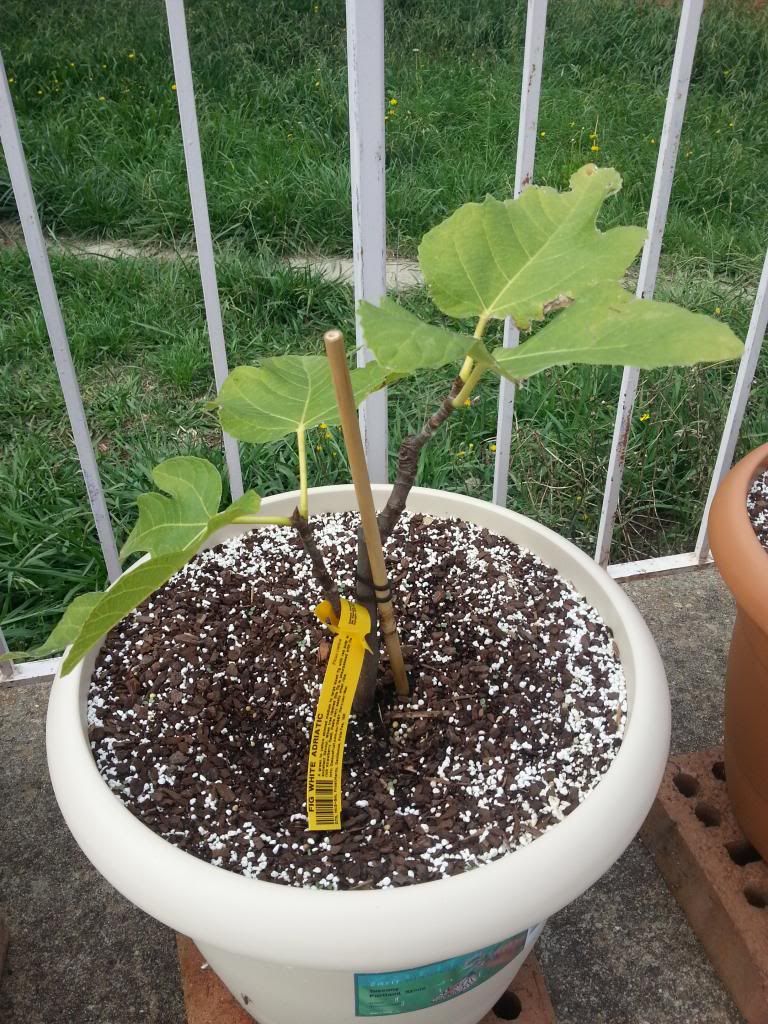
I purchased my White Adriatic from Daley's Online Nursery in January 2013, it came nicely boxed, and I can still remember that of the three fig trees I bought when I opened the White Adriatic box I was greeted with a wonderful figgy aroma of the leaves.

In March 2013, my plant looked like this, about a week after transplanting;

5th Feb 2013 White Adriatic
I originally potted my White Adriatic into 5-1-1 potting mix, and had great expectation for growth. Sadly, however, this was not to be, and 28 days later my plant had gone backwards slightly, losing some leaves and colour.

3rd March 2013 White Adriatic
By April that year it had begun to put out a small amount of new growth, but lost it all shortly thereafter with the first frost.

5th April 2013 White Adriatic
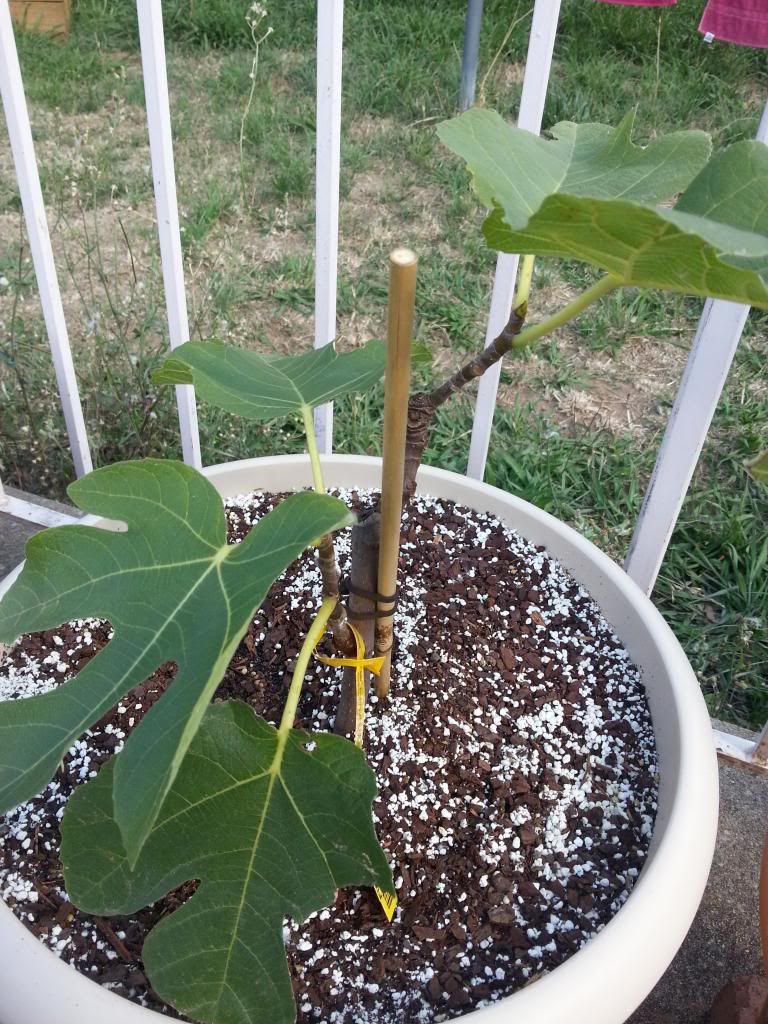
I suspected that the soil mix I had used was the cause of my lackluster growth, and took the opportunity to repot the plant into a larger pot, with a mix made primarily of coconut husk chips.

28 July 2013 White Adriatic in a new soil mix and larger pot
Shortly after repotting, the plant took off. Buds broke about 2 weeks later, one of the earliest figs in my collection to break.

15th September 2013 - White Adriatic bud break
After this, growth took off in my new container mix, and just 8 days later my White Adriatic already had more leaves than in the months preceding dormancy!

23rd September 2013 White Adriatic
Another two weeks, and growth was speeding along! In less than a month from breaking dormancy this plant had put off more growth in its new container mix than the 3 months prior to dormancy! I was amazed.

9th October 2013 White Adriatic
By December White Adriatic was producing its first figs.

12 December 2013 White Adriatic
Today, about a month before dormancy, my White Adriatic barely resembles the plant I purchased a year ago.

18 March 2014 White Adriatic 

The Fruit

My White Adriatic ripened its first two fruits at the end of January, these were breba figs.

31 January 2014 - First ripened fruit
The first fruits were small to medium in size, with a varied interior ranging from dark red to light pink.

1 February 2014 - White Adriatic breba crop fruit
 
1 February 2014 - White Adriatic breba crop interior
 The flavour was sweet, honey like and tasty. 

Later in the season my White Adriatic ripened some of its main crop, which had different colour and texture to the breba;

20th March 2014 - White Adriatic main crop
20th March 2014 - White Adriatic main crop interior
The main crop was much juicier than the breba with a uniform deep red colour. Its flavour was rich, sweet and berry-like. Far superior to the breba.

My White Adriatic still has a number of unripe fruit on its branches, however as the season draws to a close for the year I don't believe too many more will ripen, the plant is still young however,and I expect a much larger crop next year!

Problems

My White Adriatic has been moderately affected by rust in the last few weeks, likely a result of a larger amount of rain in the previous weeks. Rust begins as brown spots on the undersides of leaves, and can cause defoliation. Once rust appears it is difficult to deal with. Rust is fungus that spreads its spores from leaf to leaf through water droplets and can be treated in dormant phase with a copper based fungicide. All dropped leaves from rust infected plants should be destroyed.   

Rust on White Adriatic

Friday, March 7, 2014

The Great Container Mix Experiment Week 19

Well, it's been a fair few weeks and I have been very slack updating this. Well, mostly slack. Three weeks ago my wife and I welcomed into the world a boy and girl, twins, and I have been quite consumed by this over the last few months! I will endeavor to update this more frequently, before the cold hits in about 6 weeks.

Week 19 - Summary of results

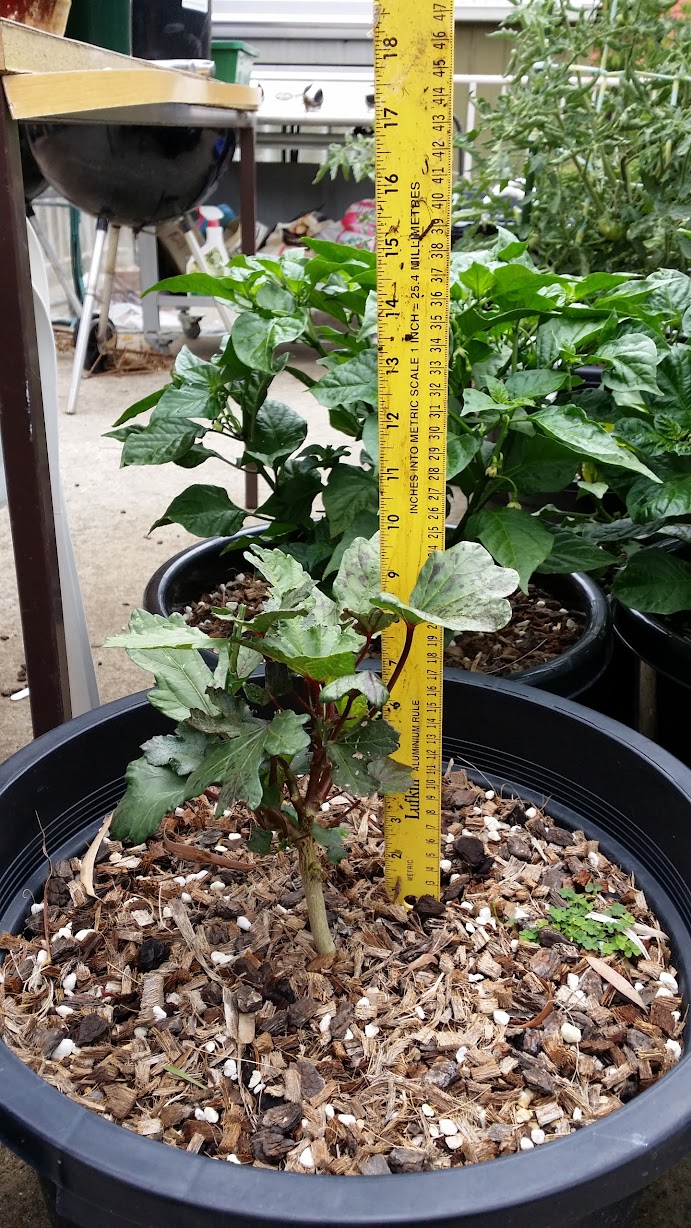
In a nutshell, my chilis are doing great, and my okra are doing, well, not so great. I think the early cool that hit all my seedlings severely ruined their potential for growth, as my okra in pots, and in the ground are all fairing quite poorly, and are looking scrawny and unwell. They have put on some growth however, and out of all my soil mixes the plain potting mix stands out as the winner to date, with the highest percentage change in growth since the experiment began, followed closely by the 5-1-1. My stunted okra in coconut husks is really having a sad time, although it appears to be doing ok, when judged solely on height.

My fatalii peppers are growing great, putting off a great number of bright yellow pods. These little beasts pack quite a punch, and I foolishly downed a whole one a little while back, and was quite severely punished. The plain potting mix has given the largest growth in cms, however in total percentage change growth the 5-1-1 and coconut husk chips are tied.

Similarly, the plain potting mix has given the best growth in cms for my banana chillies, in total percent change growth however the coconut husks far exceed the other mixes. The coconut husk chips also produce many more pods than the other two mixes, with the weight of the chillies dragging the plant towards Earth.

Banana Chilis, the coconut husk chips (right) produce many more chillies
Fatalli pods

Percentage change, all soil mixes week 1 to 19

Okra

My Okra are doing pitifully. The leaves are looking thin, and the leaves are fairly sparse. The plants do put out a number of pods, and the need to be picked constantly or they grow long and hard and inedible.

The okra put off beautiful flowers reminiscent of hibiscus, to which family they belong. The bees are quite fond of these flowers. The okra flowers do not even last a full day, having wilted and dropped by late afternoon,to be followed by extremely quick growing pods.

In terms of growth, there is little difference in height between all soil mixes, with 5-1-1 putting on the most growth in total height, and the plain potting mix having the highest percent change in growth. The coconut husk mix plant is very sad, scrawny, sick but is still putting on height.

An okra flower
Onto the numbers!

Okra growth in cms

Okra percentage change in growth since week 1

Fatalii Chillies

My fataliis are doing very well. They are all producing pods, and are getting even more tall and bushy. The plain potting mix performs on par with both 5-1-1 and coconut husk chips. In total cm growth the plain potting mix outperforms both other mixes, while percentage-wise 5-1-1 and coconut husk chip growth are identical.

5-1-1 left, plain potting mix center, coconut husk chips right
Fatalii growth in cms
Fatalii total percent change in growth

Banana chillies

The banana chillies are doing well, although don't put off as many chillies as I would like. I think they are limited by the smaller size of the pot.

The coconut husk chips put off many more pods than the other two plants, and the weight of the pods have caused it to lose a branch, and have others dragged right down, requiring staking.


Banana Chillies growth in cms
Banana chillies total percentage growth

Photos of measurements week 19

'Fine' 5-1-1
Plain potting mix
Coconut husk chips
Fatalii in 'coarse' 5-1-1
Fatalii plain potting mix
Coconut husk chips
Banana chilli 'coarse' 5-1-1
Banana Chilli plain potting mix
Banana chilli coconut husk chips


Friday, January 3, 2014

Great Container Mix Experiement - Week 10


As we enter the new year, I have done my next round of measurements. Canberra has had some very warm days, and warm nights, and this has allowed all my plants to get a bit of a boost. The Fataliis' in particular are going mad.

Lets get straight into it.

Summary of Results

My Okra stunted from the cold a few weeks ago has begun to move again, and put on 6cms in the last 3 weeks. It looks as if it is ready for a real growth surge, and I have hope it will catch up to its taller brothers. The banana chillies are also growing quickly. They are in smaller pots, and the plant in pure potting mix needs watering every day or else it wilts quickly. The plant in 5-1-1 wilts if not watered every day, and it is a very hot day. Interestingly the plant in coconut husk chips has never wilted once, I am not sure if this is due to the plant being smaller than the other two, requiring less water, or a property of the mix itself.

Percentage wise, between week 7 and 10, the Fatalii in 5-1-1 grew the most, with 88% change in height. In total height gained, the Okra in pure potting mix put on the most height, adding 21cms.

The chart below shows total percentage growth for all plants in all mixes from week 1 to week 10.

Total Percentage Change in Growth week 1 - week 10

Okra

All the okra have put on size over the last 3 weeks, and have begun producing pods. I have only harvested 1 or 2 at this stage, but I think things will pick up as summer goes on.

The okra in plain potting mix has started to close the gap with the plain in 5-1-1, putting on 21cm and 16cm respectively. The okra stunted from the cold has put on 6cms, a 33% change in height over 3 weeks. The rate of growth for the okra in 5-1-1 is reduced compared to the plant in plain potting mix and coconut husk chips, over the same 3 week period.


Fatalii

The Fatalii peppers have really taken off, add density and size. This experiment only measures plant growth on a height scale, however if other considerations such as width were taken into consideration, it is easily seen that the plant in plain potting mix is performing the strongest followed closely by the coconut husk chips.

This can be seen in this picture, of all three plants side-by-side. The coconut husk chips are to the right, the plain potting mix in the center, and the 5-1-1 on the left.

The plain potting mix (center) is denser, and slightly larger than both other plants
Here are the numbers for each;


Banana Chilli

The banana chilli in the plain potting mix continues to put on size, and the coconut husk chip plant is picking up steam quickly. The plant in 5-1-1 is also performing extremely well.

The plant in plain potting mix requires watering every day, or else it begins to wilt before the days end.

Below is a picture in their current size. You can see that the plant in pure potting mix has more chillies, and is taller than the other two.

5-1-1 on the left, plain potting mix in the center, coconut husk chips on the right

Here are the numbers;


Photos of Measurements Week 10

Okra Coconut Husk Chips
Okra Plain Potting Mix
Okra 'Fine' 5-1-1
Fatalii Coconut Husk Chips
Fatalii Plain Potting Mix
Fatalii 'coarse' 5-1-1
Banana Chilli Coconut Husk Chips
Banana Chilli Plain Potting Mix
Banana Chili 'coarse' 5-1-1

Latest Posts