Sunday, August 4, 2013

The Great Container Mix Experiment - Part 2, Making 5-1-1


In the largest forum on the internet regarding container gardening a very active forum member Tapla is an extremely useful source of information, who has grown container plants and bonsai for a number of years.

His latest thread on the topic, which is constantly being superseded is available here. He is often around and is very generous with his advice and time.

From the thread listed above Tapla lists the ingredients for his 5-1-1 mix as;

"The 5:1:1 mix:
5 parts pine bark fines, dust - 3/8 (size is important)
1 part sphagnum peat (not reed or sedge peat please)
1-2 parts perlite (coarse, if you can get it)
garden lime (or gypsum in some cases) 
controlled release fertilizer (if preferred)"

Note 3/8 inch is 9.5mm. So the mix calls for dust size pine bark to 9.5mm.

I have had mixed results with this mix in the past, but am slightly suspicious that it may in fact have been something I have done wrong. I am conducting this experiment in order to work out just how much of a benefit such a mix will give compared to plain potting mix or other media such as coconut husk chips.

As the 5-1-1 mix relies on the right size pine bark to work properly, in this experiement I am mixing two batches of 5-1-1 with two different types of pine bark to give it a proper chance to perform. The mix I made previously seemed too wet and sloshy.

The Ingredients

Pine Bark

I am using two types of pine bark, both graded to the size Tapla suggests, however one tending toward the larger particles and one tending to ward the finer particles. As my problems previously were made with the smaller pine bark fines, I have made mostly larger grade mix, with a single comparison with the finer pine bark for comparison.

Fine Pine Bark
Larger Pine Bark Pieces (most under 10mm)
Here is an indication on their differences in size.

Coarse VS Fine VS Perlite

Perlite

Perlite is a type of volcanic glass that occurs when certain minerals are heated to a certain temperature. It is very light and white and resembles the beans from a bean bag. Perlite is my top contender to why my previous 5-1-1 mix was so wet, as the perlite purchased from Bunnings is very fine. For this experiment I have tracked down a big 100L bag of coarse perlite, which can be found online or your local hydroponic store for around $50. 

Coarse Grade Perlite

Sphagnum Peat Moss

Sphagnum moss is the dead and decayed sphagnum plants that grow in peat bogs around the world. Care should be taken to find a source of peat that is sourced from renewable bogs. I found mine at a local nursery, and it wasn't particularly cheap at around  $80 for the bag below.

Sphagnum Peat Moss 

Mixing the 5-1-1

Mixing up 5-1-1 is very easy, simply 5 parts pine bark, 1 part peat and 1 part perlite. I start by using a wheelbarrow and a 8L pot.

First I measure out five pots worth of pine bark fines and add them to the wheelbarrow.

'Fine' Pine Bark Fines

'Coarse' Pine Bark Fines

Next add one pot worth of perlite

'Fine' Pine Bark


'Coarse' Pine Bark

Next I give it a mix through and then add one pot full of peat.

'Fine' Pine Bark

'Coarse' Pine Bark

Finally, the recipe calls for the additional of dolomitic lime. I added one handful, and one handful of slow release Osmocote fertiliser. I also added two handfuls of organic Dynamic Lifter.

Adding Dolomitic Lime and Osmocote

It is important to wet this mixture well after mixing, as peat moss and pine bark are quite hydrophobic when dry. When I wet this mixtures they both turned to a similar mud-like consistency.

'Fine' 5-1-1

'Coarse' 5-1-1

I then potted up the mix into its pots ready for the experiment. Below is my rows of course and fine 5-1-1 ready to go, as well as the pots of plain potting mix (with added dolomitic lime, osmocote and Dynamic Lifter for consistency). 

Three pots of 'Coarse' and one pot of 'fine' 5-1-1. Potting mix in the centre. 

Next post will be making the coconut husk mix, which kind of has a bit of everything in it. Just waiting on the main ingredient to be delivered!


Introducing the Great Container Mix Experiment!

Im back! With the beginning of August we begin our countdown to Spring, although you wouldn't be the first to wonder whether or not Spring had already arrived! Across our suburbs cherries and other fruits are blossoming, and a few of my potted plants are showing the first signs of life!

I will leave our unseasonable warmth for another post, for all winter I have been thinking upon more and more  upon another pressing issue... Soil mixes.

Much of last year, I spent my time searching for the best soil medium that would grow a wide range of plants, and I could use as a reliable medium that would both retain a good amount of moisture, but also would also be porous enough to allow the plants roots access to plenty of air.

As can be read in my previous post on soils, the role of the soil medium is simply to anchor the plant, provide dissolved nutrients and water, and to provide air.

I began my search on the GardenWeb forums, and pretty soon into the adventure found that a forum member ‘Tapla’ was renowned for having two soil mixes that met all these properties. One of these mixes his ‘5-1-1’ mix was made up of three ingredients; partially composted pine bark fines, perlite and peat moss.  

After finding suitable pine bark fines, I quickly potted up a number of plants including fig trees, blueberries, bay tree, dwarf lemon tree and a dwarf peach. 

All potted in Tapla's 5-1-1
I was very excited and expected a tonne of new growth. The season however by this stage was nearly over, having potted everything up in the beginning of February, the final month of summer.

Besides one or two blueberry bushes, I saw very little growth from any of my plants after planting in the mix, despite having a month of summer remaining. I have various possible theories why, in particular some very hot days which might have stressed the plants. I have a suspicion that my figs in particular were heat stressed, because when the heat finally dissipated the figs started to put on some new leaf growth.

May 2013 - Where's my growth!?
Feb 2013


I had a couple of other issues with the mix, on most days I would water it in the morning, and come home to find plants wilting- despite the soil being obviously damp. A quick drink and plants perked up again. The biggest issue however came when I had some issues with my blueberries suffering a nutrient deficiency and beginning to show signs of leaf chloriosis.

Chloriotic Blueberry Leaves due pH

Blueberries are picky plants in their pH requirements, and despite the 5-1-1 mix being inherently acidic the water I was using was too alkaline, and was slowly killing my plants. I fixed this by adding small amounts of sulphuric acid to the watering can before watering, but in the process also added more soil mix to the plants.

It was during this process that I noticed that the soil mix was absolutely saturated despite not having been watered at all that day. The mix had collapsed to the point of a store bought mix, but seemed to be holding excess water, not the porous aerating soil I hoped for. I amended the mix, adding larger pine bark pieces, and the plants seem to be doing ok, although they are all now dormant.

Unhappy, I decided to follow in the path another forum user had suggested, coconut husk chips (CHCs). CHCs are the fibrous part of the coconut that have been cut into fairly uniform square sizes. The chips come in a compressed block that supposedly expands to make up to about 60L when hydrated. Coconut husk chips have some beneficial properties to pine bark, such as hydrating from a dry state easily, where pine bark fines tend to become hydrophobic once dry.  CHCs also held a good amount of air and water.

Using CHCs I have potted up most of my plants, and now only a few plants remain in the original 5-1-1 mix I made in February, despite having not had a chance to see if it is effective or not.

My current mix- Primarily coconut husk chips, with perlite and pine bark

 Still, doubts remain. Did I throw the 5-1-1 aside too quickly, and judge it too harshly? If I had potted in Spring would there have been a difference? Will the CHCs even perform well (everything has been potted whilst dormant).

The CHCs certainly look good when mixing, and look like they will perform an excellent job, but even this, perhaps, is unnecessary.

And so, beginning in the Spring of 2013 I intend to test all of this with an experiment.

The Great Container Mix Experiment


Introducing now the great soil mix experiment, where I will attempt to determine for myself once and for all the best mix to put my potted vegies and fruit trees into! Is it really worth all that effort to source fancy ingredients when a $5 bag of potting mix from Bunnings will do the same thing?!

There is only one hopefully, mostly scientific way to determine this. Grow a number of the same plants in different soil mixes and see how they perform under the same conditions. And to be super sure, I will grow a couple of different types of plants side by side.

I am going to grow four types of plants each in three different soil mixes and measure the differences in growth across the season. I am going to record all growth against a control group of plants using straight potting mix from Bunnings. In total, I will have three different mixes to test;
·         Pure potting mix
·         Tapla’s 5-1-1 mix (two versions)
·         My current experimental mix which is made up primarily of CHCs but also has pine bark, perlite, compost           and manure    
  
For this experiment I have decided to use four different types of plant so that my results are more than just the result of a particular type of plant preferring a particular mix. The plants I will choose for this are;
·         Grape tomato, which does not require staking
·         Fatalli Chilli
·        Basil (or possibly egglant)
·        Banana Chilli 

These plants have been chosen for their size and suitability for pots, and also based upon what I use a lot in cooking.

Plants will be grown in two different sized pots. Half will be in smaller 8L pots and the other half in larger 30(ish)L pots. All seeds will be germinated directly in the mix so that transplant shock is not a concern. 3 seeds will be planted in each pot and the most healthy seedling kept.

Plant growth will be measured in a number of ways, including germination time, height and apparent vigour. Fruit count and quality will also be recorded at intervals. Photos will, of course, be provided at weekly intervals.

I am quite excited to get this on the road, and have already mixed up the 5-1-1 mix! Read more in my other post!

Wednesday, May 8, 2013

Garden Updates

First Real Frost!

Icy Silverbeet
On Monday I awoke to find the yard carpeted in a shimmer of white, as the first real frost of the season hit. Well, that is to say, the first frost I was up early enough to witness! It was cold enough that as I went to water the garden I spent 5 minutes trying to find the kink in the hose before realising that the hose had frozen solid somewhere.

It was also cold enough to partially defoliate my fig tree that is planted in the ground, although my figs in pots were spared, being up off the ground.

This fig tree hadn't lost any leaves until Monday

Tree Removal

Although currently hit by a nasty flu, I woke up Sunday feeling inspired enough to tackle the Privet trees in my backyard (which I previously had thought were camphor Laurels!). Privets (and Laurels) are a noxious weed in many parts of Australia due to their ability to spread extremely easily via birds, who eat the small berries they produce, and by their vigorous growth, which forms thickets and out-competes native and other plants for sunlight.

Privet Thicket

Privet Leaves and Berries

Each Privet berry contains two small seeds which germinate readily in exposed or disturbed soil. Privet can also regrow via suckers along their roots, so I hope I removed enough so that I don't have another wave of plants come up!

The thicket in my backyard was actually a clump of about 20 trees. A mature privet, according to an Australian Government website, has the ability to produce up to a million seeds per year, and the berries support unnaturally high populations of Currawongs which then displace other native birds. 

The invasiveness of the tree can easily be seen after I chopped off their heads, and it became evident how many trees were growing in the thicket. I have since dug them all up, and planted a brand new persimmon tree in their place.

In Canberra the ACT Government sponsors a weed exchange, where you bring in certain varieties of woody invasive weeds, and they exchange them for a native plant. Privet meets these requirements, although I think I have missed the swap, which usually occurs twice a year in early Autumn and Spring. HERE is a link for those in the ACT with privet trees in their backyard, and who would like some extra encouragement to chop them down!

There Were 21 Individual Trees Here!

Cauliflower Harvest

On Sunday I harvested my first cauliflower. It was a nice size and weighed in at just over 800g. If growing without insecticides, as I am, it is a good idea to soak your newly picked cauliflower in salt and water, as it will drive out any caterpillars that may have taken up residence!

Cauliflower With Beer for Reference

I immediately cooked it up into a delicious Indian curry, which is very tasty and great for those who like curry, but are scared of spicy food. It is very easy to make, and I encourage everyone to try it!

Mild Cauliflower Curry in a Coconut Sauce

Ingredients:
2 tbs oil
1 cauliflower
1 onion
2 tomatoes
2 tsp garlic
1 tsp salt
1 tsp sugar
2 tsp cumin seeds
1-3 chillies (optional)
1 teaspoon tumeric powder
1.5 teaspoon tamarind paste
3/4 cup of warm water 
400ml coconut milk

Method

1. Cut the cauliflower into small florets, rinse, and set aside. Dice the tomato into medium to small chunks and set aside. Add 1.5 tsp tamarind paste to the warm water, mix well and set aside. 


2. Chop the onion and chillies (if using) and put in a food processor with the garlic and tumeric and blend to a paste.


3. Heat the oil in a wok or pot and add the cumin seeds until they start to splutter. Add the spice mix from the processor and cook on medium for 5 minutes, making sure it doesn't burn.


4. Add the cauliflower florets, and stir to coat with the spice mixture in the pan, and cook for a further 5-10 minutes stirring constantly.


5. Stir in the coconut milk, salt and sugar and cook for 10 minutes before adding the tamarind water mixture. Do not let it boil or the coconut milk might separate. If the mixture is too watery, simmer gently until it reaches your preferred consistency. Finally add the chopped tomato, allow to heat through for 5 more minutes before serving!


Saturday, May 4, 2013

Cauliflower and Peas

Cauliflower

I haven't tried growing any brassica crops before this year, and had intended to put down cauliflower, brocolli and brussel sprouts, however this all got turned on its head when I planted way, way too many cauliflower. I had no idea how large these plants would grow, and now have ended up with a veritable sea of cauliflower plants in my garden bed.

Cauliflower plants have huge leaves and take up tonnes of space!

My Field of Cauliflower

The seedlings begin life deceivingly small, however following the seed packet instructions, I planted them at their minimum distance of 50cm. Next time I will give them about 60cm between plants, because their leave are huge, and I feel they are a little cramped. I initially started my seeds in January and planted them into a newly dug garden bed in February. Today most of the plants still do not have cauliflower heads growing except for one. which looks like it will be ready to be picked in a few days.

Cauliflower head

  Cauliflower pests!

White Cabbage Butterfly

By far the most destructive pest to the cauliflower is the caterpillars of the white cabbage butterfly, pictured below source.

White Cabbage Butterfly
These butterflies lay clusters of eggs under the leaves of all brassica plants, as well as some other varieites as well. In Canberra, they are everywhere, at first I would try and chase them down with a hose or stick, but as the relentless armies of butterflies fluttered forward towards my plants I have resigned myself to finding and squishing the caterpillars as I find them.

The butterflies are attracted to the plants by the smell of the plants leaves, and do a characteristic 'double touch' before laying their eggs on the undersides of the leaves. The first touch is to identify the host plant, and the second touch is to lay the eggs once an appropriate food source has been found. 

The butterfly lays small yellow eggs, either in clusters or spread out on the underside of the leaf, and can fairly easily be removed, or squished. After they hatch the caterpillars begin life as tiny green little devils who grow in to fatter green devils as they age.

White Cabbage Butterfly Caterpillars 
   
Leaf Damage Caused by White Cabbage Butterfly Caterpillars 
More Leaf Damage

Aphids

Most every gardener knows of aphids, the small sap sucking insects often farmed by ants, and they seem to love my cauliflowers, although only recently making an appearance. I am currently looking into an organic control method for these suckers, and I have heard a concoction of chilli and dishwashing liquid might do the trick, if anyone has any secret recipes they would like to share, post below!


Aphids hiding in a curled up portion of leaf

Peas!

Well two months ago I posted about my pea seedlings coming up, and today I took my first small harvest of sugar snap peas. 

First Harvest!

I am growing shelling peas, and sugar snap peas, and both are doing well, although the shelling peas have only just begun flowering. The peas are growing both in pots and in ground, and for whatever reason they much prefer the pot environment growing large healthy leaves, and thick stems. The plants in the ground receive a few hours less sun each day and are much wimpier in comparison, although only planted three weeks later.

March 2013

April 2013
 May 2013
May 2013 - Relatively small plants growing in the ground (planted three weeks later)
These peas have been quite simple to grow, however do seem to drain a fair bit of water from the soil, requiring water every 2 days, or else they begin to wilt. They have not been harassed by any pests.. Yet!

The flowers on the pea plants, I find quite attractive as well, although plain and white.

Pea Flower


Friday, May 3, 2013

Chilean Guava, Columnar Apples and Olives


In the last couple of weeks I have accumulated some new fruit trees for the garden, and for pots. Several of these came from the growers market in orange, however I also had two new varieties of fig trees from South Australia delivered and some Chilean Guava from Diggers.

Chilean Guava (Myrtus Ugni)

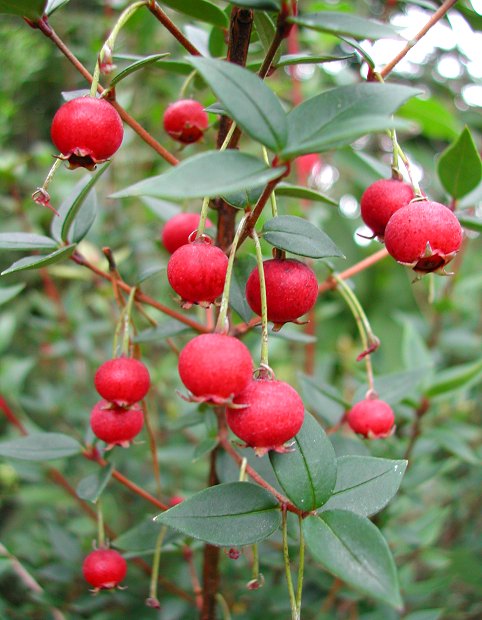
I recently came across some another blog that mentioned Chilean Guava, a shrub with small green leaves that reportedly grows one of the best testing berries you can find. Said to be the favourite fruit of Queen Victoria, these berries are small and red and apparently have a taste similar to a cross between strawberries, apples and pineapple, although most people say that it is a difficult taste to describe. The berries reputedly have a beautiful fragrance that wafts around the bushes filling your yard with scent.

Mytus Ugni berries source


They were touted as the next big thing in Australian agriculture in Tasmania, and in Aus are trademarked under the name Tazziberry. This push to grow came in the early 2000s and I have yet to see any in any stores, so perhaps something went wrong! Our New Zealand cousins across the pond are also trying to jump on this train, and have their own name 'New Zealand Cranberry'.

Whether Chilean Guava, or Tazziberry or NZ Cranberries I had to buy some plants immediately!

From all the research I have done into these berries over the last week there seems to be differing reports on how easy or difficult they are to grow. Some say full sun, some say part sun, some say full shade- in fact this is reportedly one of the few fruits that will fruit well in a full shade position.

One thing that is is certain is that they do not like to dry out, with many plant deaths throughout forums attributed to this. Some also say they enjoy a low soil pH similar to blueberries, and do not require much attention, other than being kept damp. They are frost hardy, and heat tolerant.

I decided to buy 7 plants in total, to be spread in different locations throughout the yard, some in part shade, and some in full sun. Five were from Digger's online and one two were from a local Canberra nursery and slightly more mature.


Columnar Apples 

Columnar apples grow to a smaller size than regular apple trees and can be considered a dwarf or semi dwarf, and suitable for pots. They grow as a single main trunk, with apples growing off the side, and side branches should be pruned.

For successful pollination it is important to have two varieties of trees. I bought the varieties 'Waltz' and 'Polka' from the Flemings Ballerina series. They were going into dormancy when I bought them, and have continued to lose leaves as colder weather approaches.


Olives

I bought an unknown variety of olive whilst in Orange, and once back in Canberra bought a Barnea olive from a local nursery. Olives are evergreen and cold hardy.  

Mystery Olive


Barnea Olive


Tuesday, April 2, 2013

Sweet Corny Goodness


Sweet Corn


Home-grown sweet corn is a must for the garden, if you have the space (and enjoy corn!). For maximum sweetness and flavour, sweet corn must be consumed as soon as absolutely possible from the time of picking. This is because the sugars within the corn kernels begin to transform into starches, which reduces the cobs sweetness. This means, that the corn you buy from the shop will never be as sweet and tasty as the corn you grow yourself!

Today I harvested my first four sweet corn cobs, and I have another 6-7 almost ready to be picked on my plants.


Growing Sweet Corn

Sweet corn is a fairly easy vegetable to grow. It is a hungry crop in that it takes a fair bit of nutrients from the soil during its growing process, especially nitrogen. Because of this, it is not a good idea to plant corn in the same area as a previous corn or other nitrogen hungry crops. Instead, try planting in a bed that has had legumes such as peas or beans growing, as these plants fix nitrogen into the soil through symbiotic relationships with soil bacteria.

Fresh packet corn seed germinates very readily. The seeds should be planted directly into the bed where the plants are to go. For corn, it is best to plant in blocks, as the plants need to be pollinated by wind, and close contact will help this. Plant each seed a minimum distance of 30cm apart. In warm soil, you can expect germination within about 10 days. 

Corn is a warm season crop, and will start to die when average temperatures drop below about 16oC. In Canberra this occurs by about the end of April and into May. If, possible corn prefers a warmer temperature than this, around 25oC. 

From sowing to harvest, sweet corn will need between 10-12 weeks before cobs are ready to harvest. The plants from the photo above were planted in the first week of January, and were harvested on the first of April. In Canberra, January plantings of corn may fail if early Autumn temperatures arrive, and would preferably be planted earlier, after the last frost in November or December. To prolong the corn harvest period, plantings should be staggered.

Fertilising Sweet Corn

Each sweet corn  plant produces both male and female flowers. Male flowers are produced on the top of the corn stalk. They can also be identified by finger-like straight flower. Male flowers produce copious amounts of pollen, which is blown by wind onto the female flowers;


Male sweet corn flower

Female flowers look like strands of fine golden silk, and are generally located toward the middle or bottom of the plant. Corn plants will generally produce between 1 and 3 female flowers per plant, and each of these female flowers can develop into a corn cob. If all the strands are fertilised successfully then all the kernels in the cob should develop, and corn cobs with missing kernels mean that not all the silk strands were pollinated successfully.

To aid with pollination it can help to give each of the corn stalks a shake whilst the female flowers are still young and still golden. If you wait until the strands have turned brown then it is too late. Typically this lasts for about 2-3 weeks.

Female sweet corn flower with new, golden strands and old, brown strands. This cob will be ready for harvest soon.

Harvesting

Sweet corn needs to be picked as soon as it is ready to ensure maximum sweetness. This can be recognised in two main ways. Firstly the silk tassels on the female flower will all die down into a brown colour and no, or very little golden strands will remain. The second test you can do involves peeling back a small piece of the husk until the kernels are visible, and then pierce one with your fingernail. If the liquid that comes from the kernel is clear, the corn is not quite ripe, but if it is cloudy then the corn is ready to pick. 

When picking the corn, grab the cob and pull downwards twisting at the same time and the cob should come right off easily, without damaging the plant.


Ripe, un-husked sweet corn cobs, and ripe husked cobs.

Latest Posts